-
Spine
The Spine exercise is the first series of movements performed in the PMCS Drill. It will be the first exercise performed every time in the PMCS Drill even if pain or stiffness appears to originate in another region of the body. The Spine exercise includes the following movements:
- To make sure that the neck is moving properly, compare rotation to the right and left. If there is a loss of motion to one side, this may indicate an issue with a joint in the neck.
- To address the issue, assume the Straddle Stance position before looking up as far as possible without causing pain.
- Repeat this head movement 5 times.
- Perform more repetitions if the exercise improves the issue.
- If there is any pain, seek help from performance readiness experts in the unit.
To make sure that the mid-back is moving properly, assume a seated position with fingers interlocked over the chest before rotating the trunk to the right and left. If there is a loss of motion to one side, this may indicate an issue with a joint in the mid-back.
Spine, mid-back standing mobility exercise:
- To address the issue, assume the Straddle Stance position before looking up as far as possible without pain while raising the arms up and over the head.
- Repeat this head movement 5 times.
- Perform more repetitions if the exercise improves the mid-back issue.
A modified version may be performed from the Prone position by propping the chin on the tips of the fingers and resting in this position for up to 60 seconds. Repeat several times if this improves the mid-back issue. If there is any pain, seek help from performance readiness experts in your unit.
To make sure that the low back is moving properly, perform the extend movement from the Extend and Flex exercise. If there is lower back pain or any tightness associated with this movement, this may indicate an issue with a joint in the low back. To address the issue, repeat the extend movement 10 times moving as far as possible without causing pain.
Another modified version of this exercise, using the same number of repetitions, may be performed from the Straddle Stance position with hands on the low back with the following:
- Perform more repetitions if the exercise improves the issue.
- If there is any pain, seek help from performance readiness experts in the unit.
-
Ankle
The Ankle exercise mobilizes the joints and muscles around the ankle. You can use it to check for pain and restricted flexibility and to self-treat for those issues. Perform the exercise on both ankles to check and compare for pain or stiffness. Perform the exercise on the left side:
- The starting position for the Ankle exercise is the Half-Kneeling position.
- From the starting position, move the trunk, hips, and knee over the forward foot as far as possible.
- Return to the starting position before repeating the movement 5 times.
- Perform more repetitions if the movement improves the range of motion in the ankle.
- If repeated ankle dorsiflexion does not work, perform kneeling buttock-to-heel movements.
- If there is any pain, seek help from performance readiness experts in the unit.
-
Knee
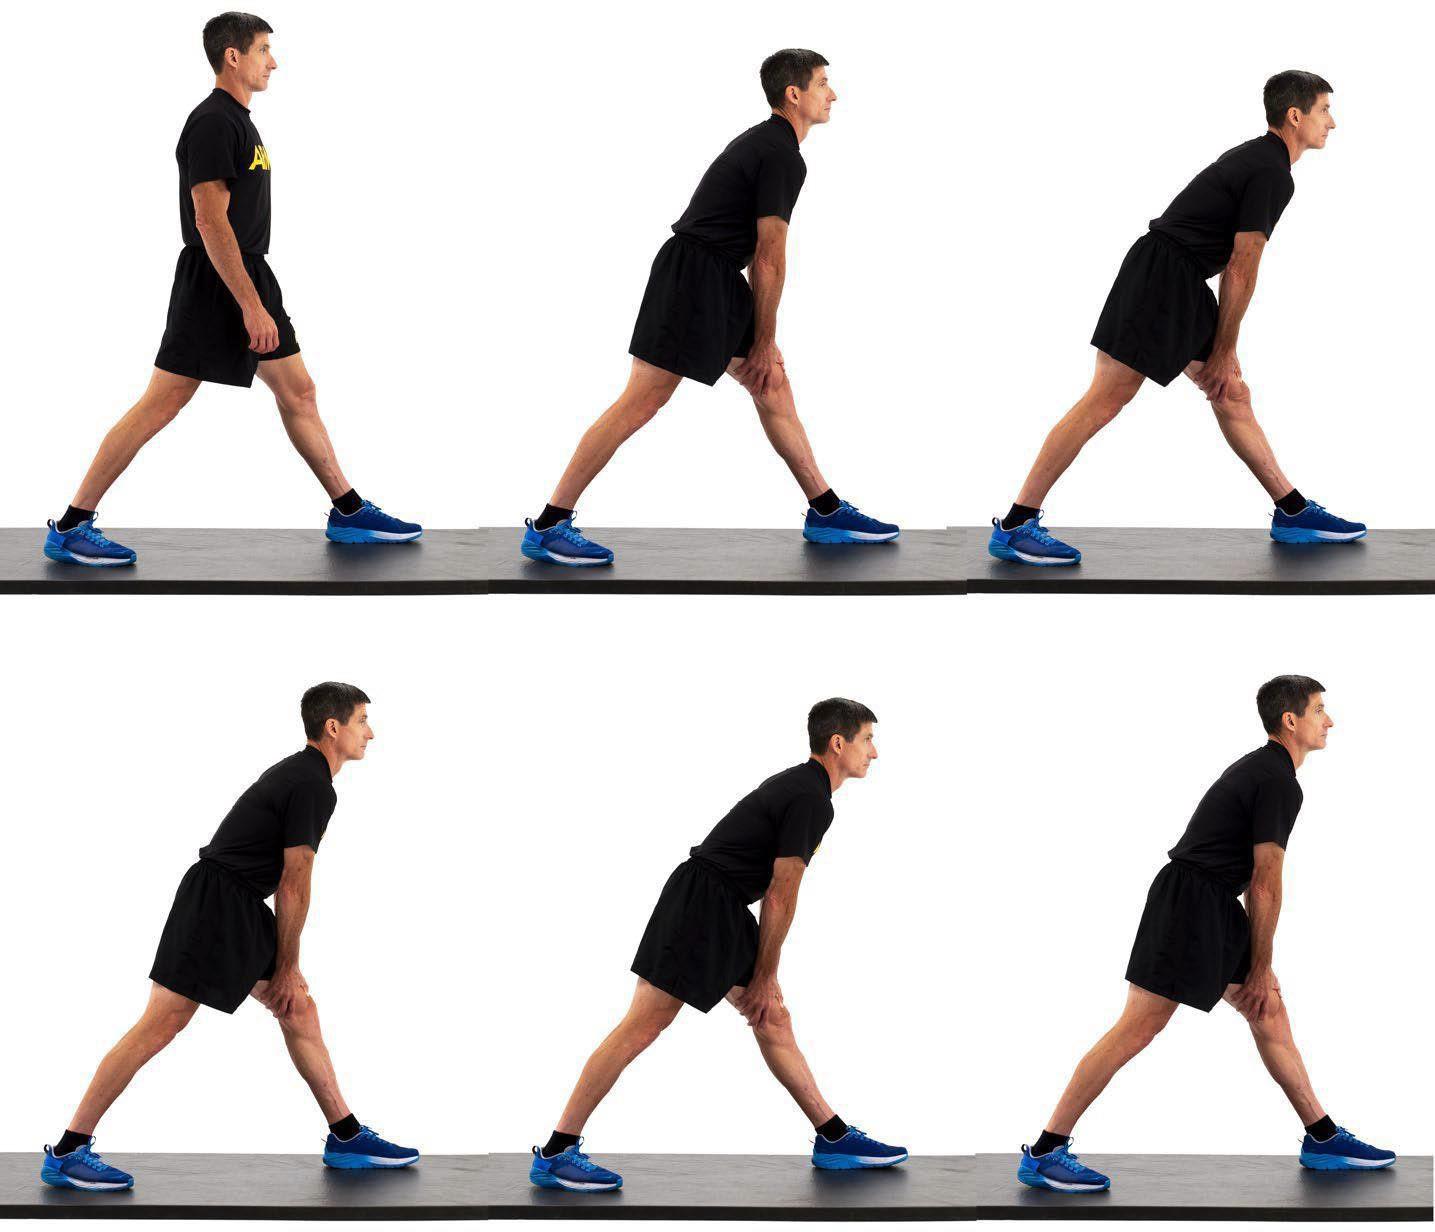
The Knee exercise mobilizes the joints and muscles around the knee. You can use it to check for pain and restricted flexibility and to self-treat for those issues. Perform the exercise on both knees to check and compare for pain or stiffness. Perform the exercise on the left side:
- The starting position for the Knee exercise is the Straddle Stance position with staggered legs and both hands placed above the knee joint on the front of the thigh.
- From the starting position, contract the quadriceps muscle and press the thigh backwards to further straighten the knee as far as possible.
- Return to the starting position before repeating the movement 5 times.
- Perform more knee extensions if the movement improves the range of motion in the knee.
- If repeated knee extension does not work, perform repeated knee to chest movements from the Supine position.
- If there is any pain, seek help from performance readiness experts in the unit.
-
Hip
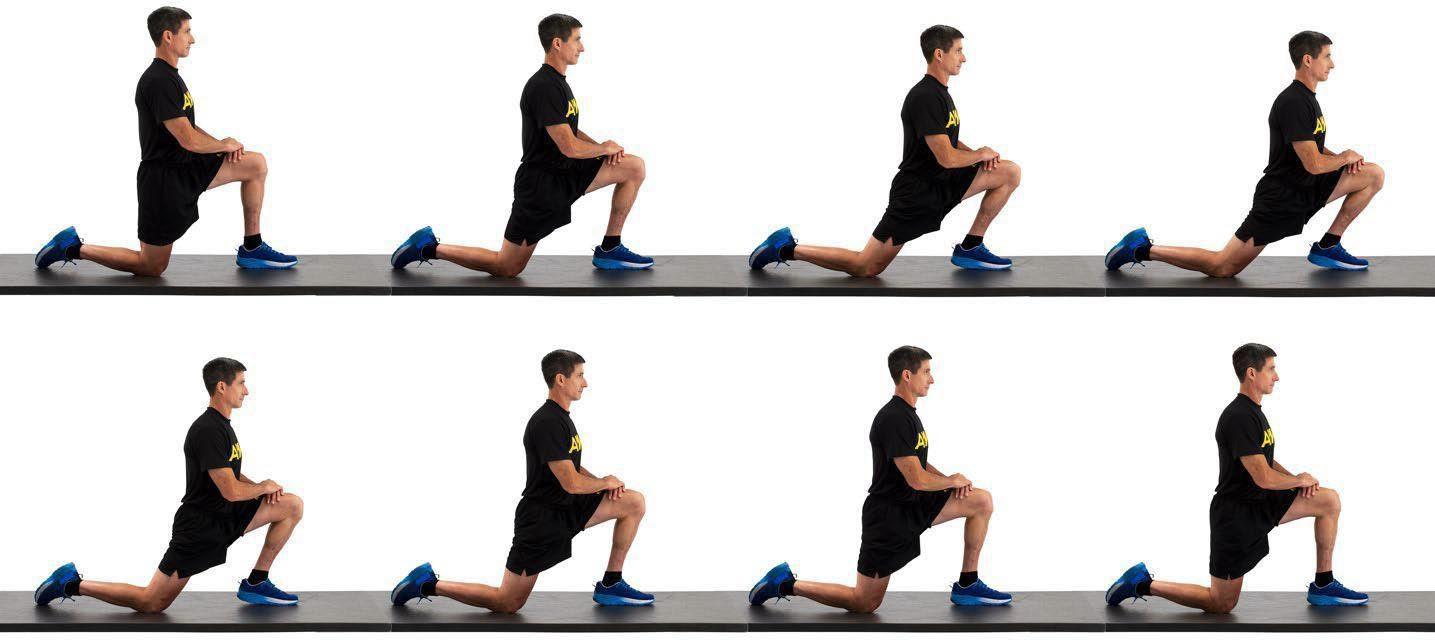
The Hip exercise mobilizes the joints and muscles around the hip and pelvis. You can use it to check for pain and restricted flexibility and to self-treat for those issues. Perform the exercise on both hips to check and compare for pain or stiffness. Perform the exercise on the left side:
- The starting position for the Hip exercise is the Half-Kneeling position.
- From the starting position, move the trunk, hips, and knee over the forward foot into a deep lunge. The rear knee rests on the ground and the trunk remains upright. This extends the hip of the rear leg and creates a stretch in the front of the rear thigh and pelvis.
- Return to the starting position before repeating the movement 5 times.
- Perform more repetitions if the movement improves the range of motion in the hip.
- If repeated hip extension does not work, perform repeated knee to chest movements from the Supine position.
- If there is any pain, seek help from performance readiness experts in the unit.
-
Shoulder
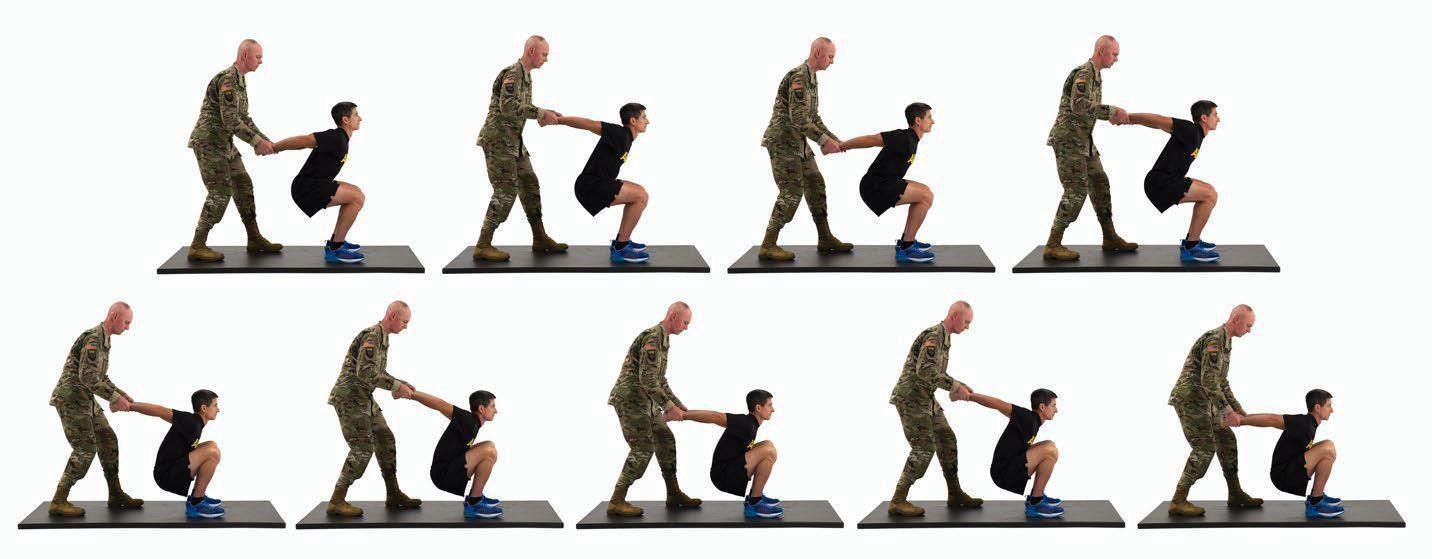
The Shoulder exercise mobilizes the joints and muscles around the shoulder girdle. You can use it to check for pain and restricted flexibility and to self-treat for those issues. Perform the exercise on both shoulders to check and compare for pain or stiffness. Perform the exercise with a partner to assist (if a partner is not available, use any suitable anchor point such as a wall, suspension trainer, or squat rack):
- The starting position for the Shoulder exercise is the Squat position with arms extended rearward and the hands held by the partner.
- From the starting position, the partner moves the arms up as far as possible to create a 90-degree angle between the arms and the upper back.
- Squat further until a pain-free end-range is reached.
- Return to the starting position before repeating the movement 5 times.
- Perform more repetitions if the movement improves the range of motion in the shoulder.
- If repeated shoulder extension does not work, try repeated movements into the parade rest position, pulling the wrist with the opposite hand.
- If there is any pain, seek help from performance readiness experts in the unit.
-
Arm
The Arm exercise mobilizes the joints and muscles around the wrist and elbow. You can use it to check for pain and restricted flexibility and to self-treat for those issues. Perform the exercise on both arms to check and compare for pain or stiffness. Perform the exercise on the left arm:
- The starting position for the Arm exercise is the Straddle Stance position.
- For the elbow—
- Support the arm with the opposite hand while straightening the elbow as far as possible.
- If the hand can be braced against a wall or other stable object, push the elbow up by the opposite hand to increase the end-range motion.
- For the wrist, keep the elbow straight while using the opposite hand to pull the fingers and hand into extension—the palm will face away from you.
- Return to the starting position before repeating the movement 5 times.
- Perform more repetitions if the movement improves the range of motion in the elbow and wrist.
- If repeated elbow extension does not work, try repeated elbow flexion. The same principle applies to the wrist.
- If there is any pain, seek help from performance readiness experts in the unit.
-
Spine
-
Ankle
-
Knee
-
Hip
-
Shoulder
-
Arm
-
Spine
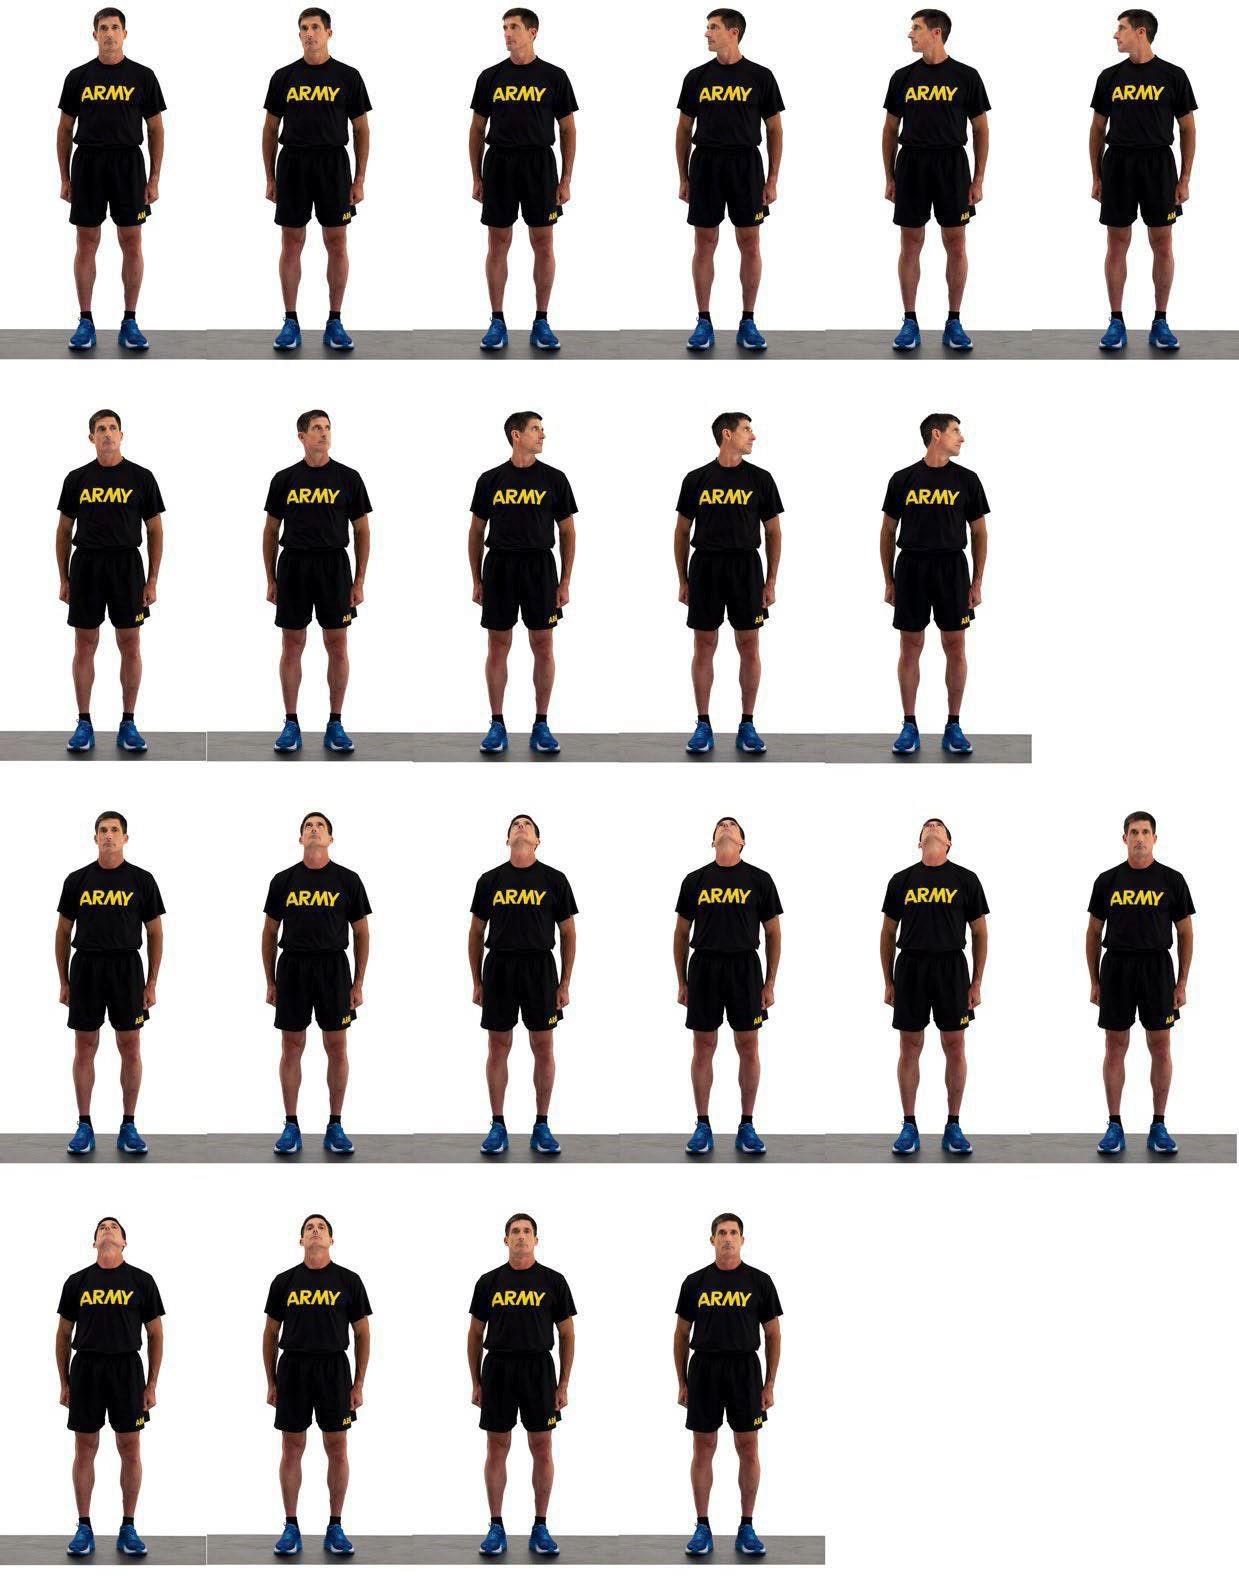
PMCS1 Spine—neck 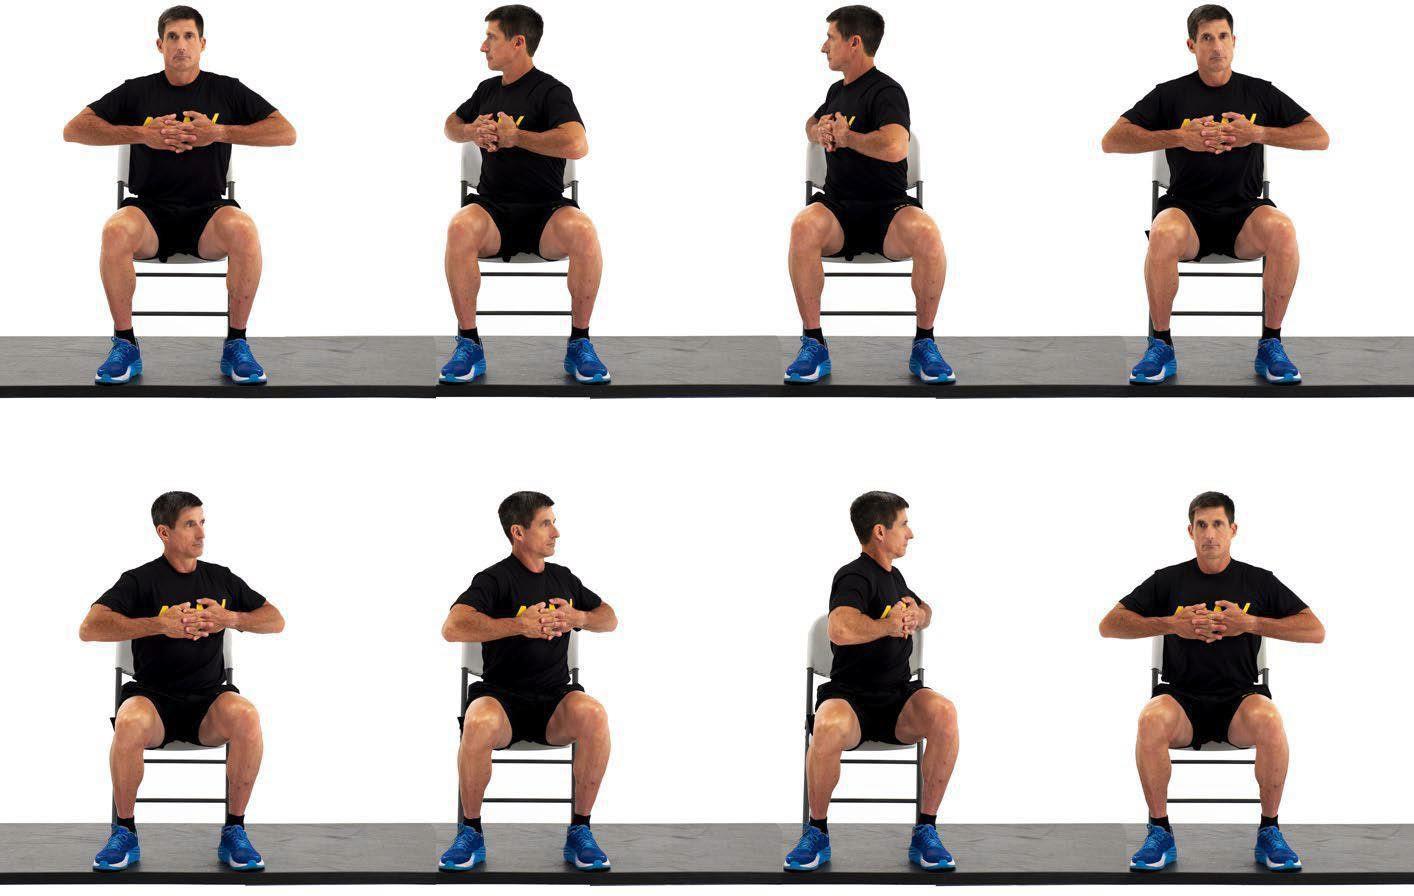
PMCS1 Spine—mid-back seated 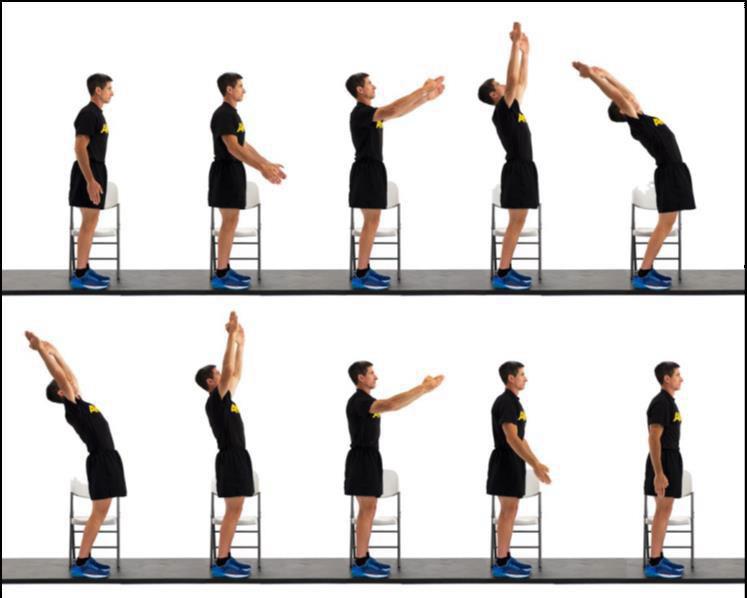
PMCS1 Spine—mid-back standing mobility 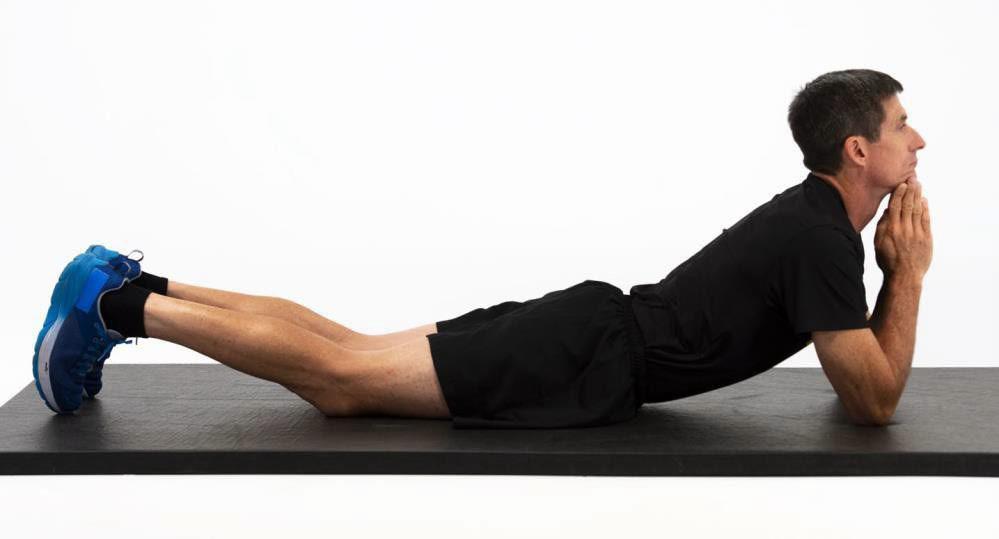
PMCS1 Spine—mid-back prone mobility 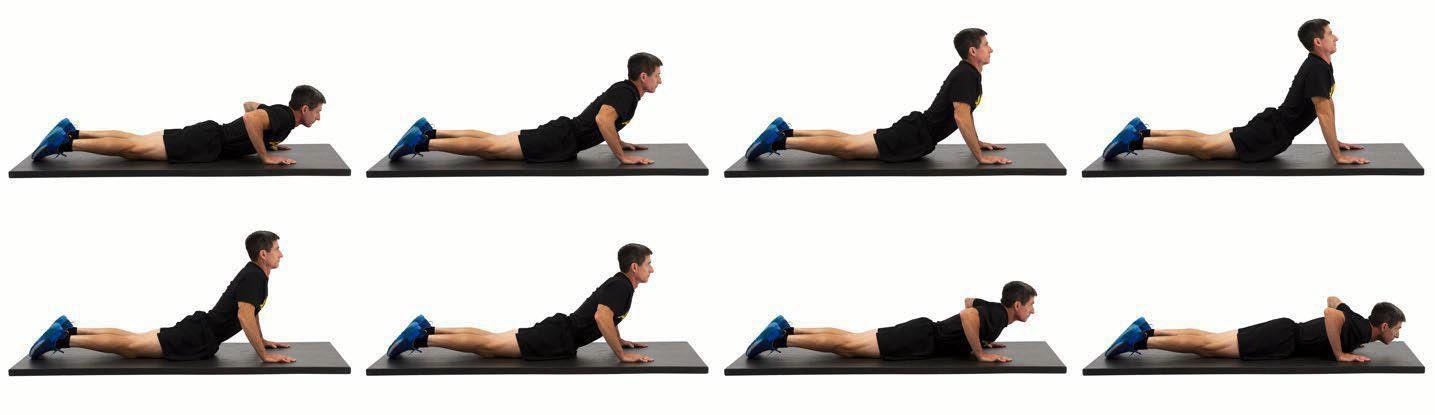
PMCS1 Spine—low back prone 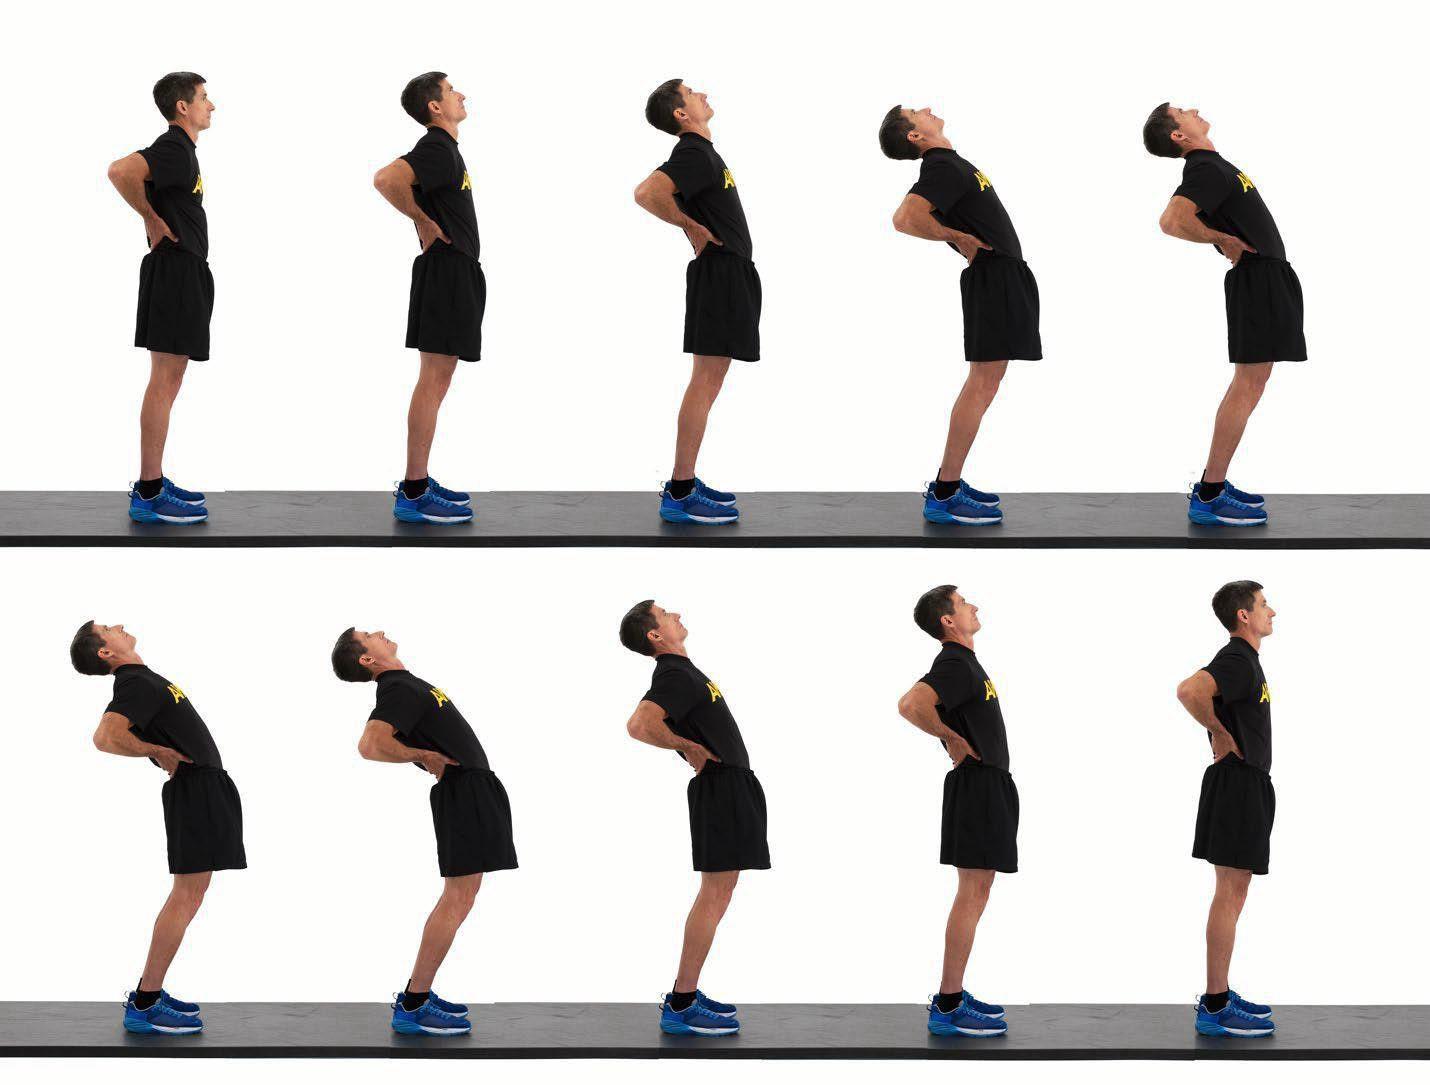
PMCS1 Spine—low back standing -
Ankle
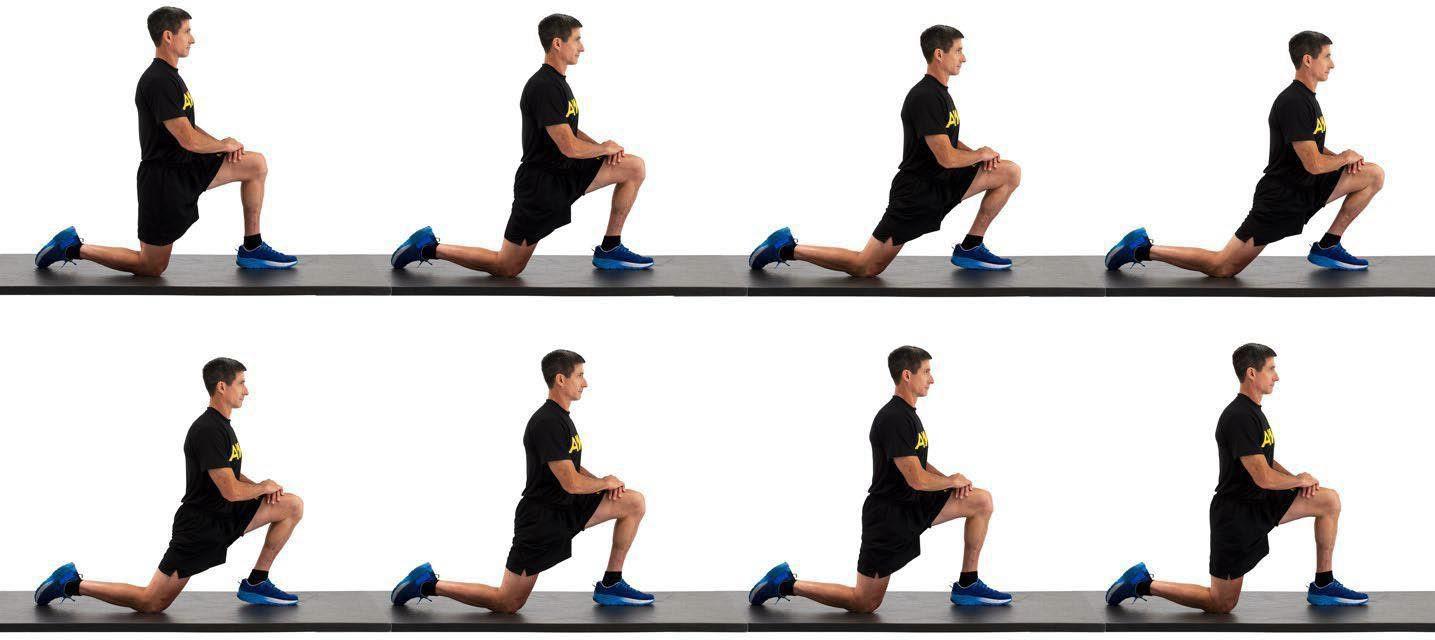
PMCS2 Ankle 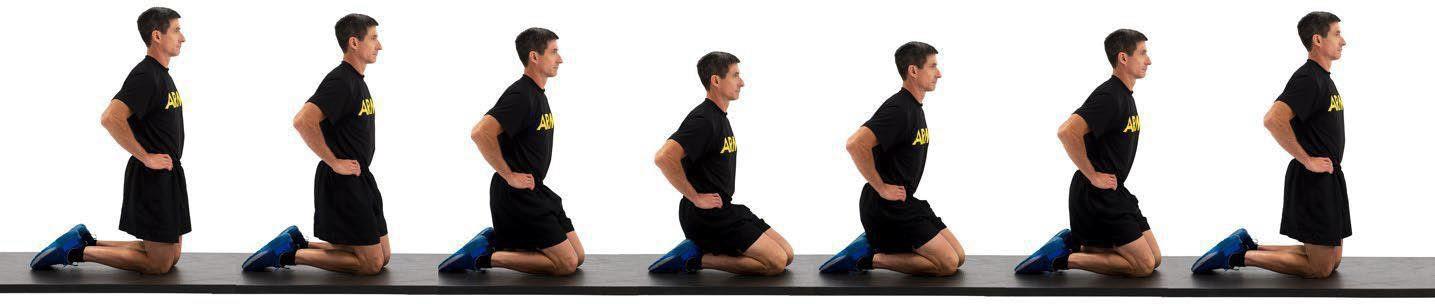
PMCS2 Ankle—kneeling -
Knee
PMCS3 Knee -
Hip
PMCS4 Hip 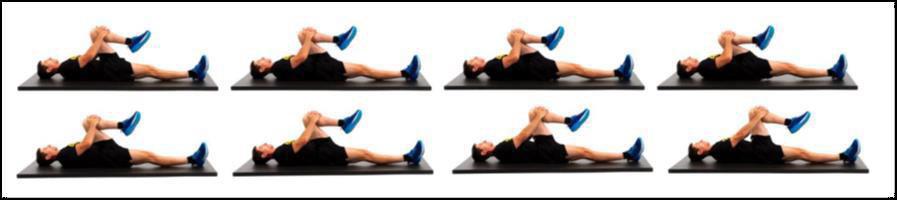
PMCS4 Hip—supine -
Shoulder
PMCS5 Shoulder—partner assisted 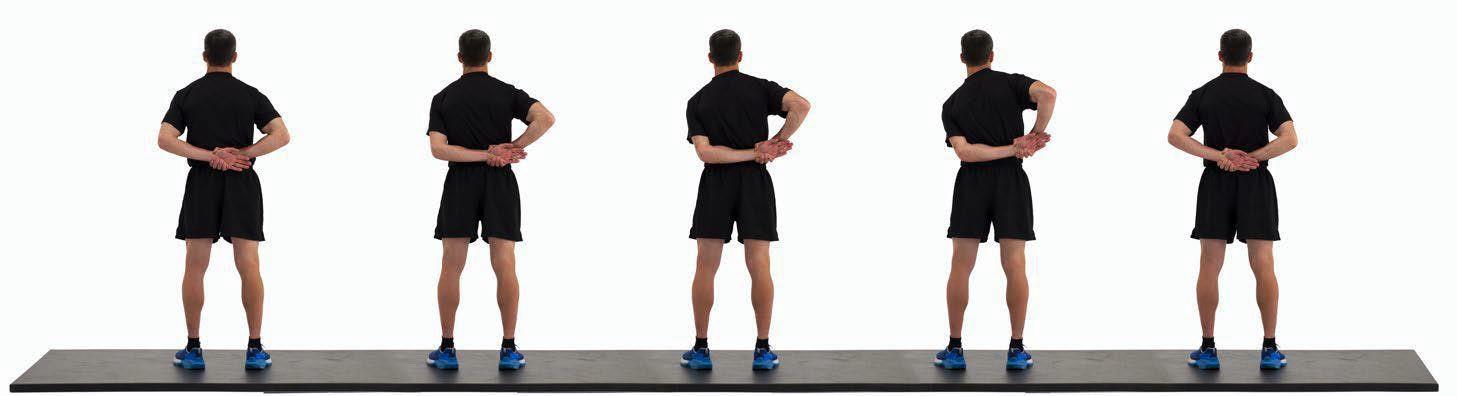
PMCS5 Shoulder -
Arm
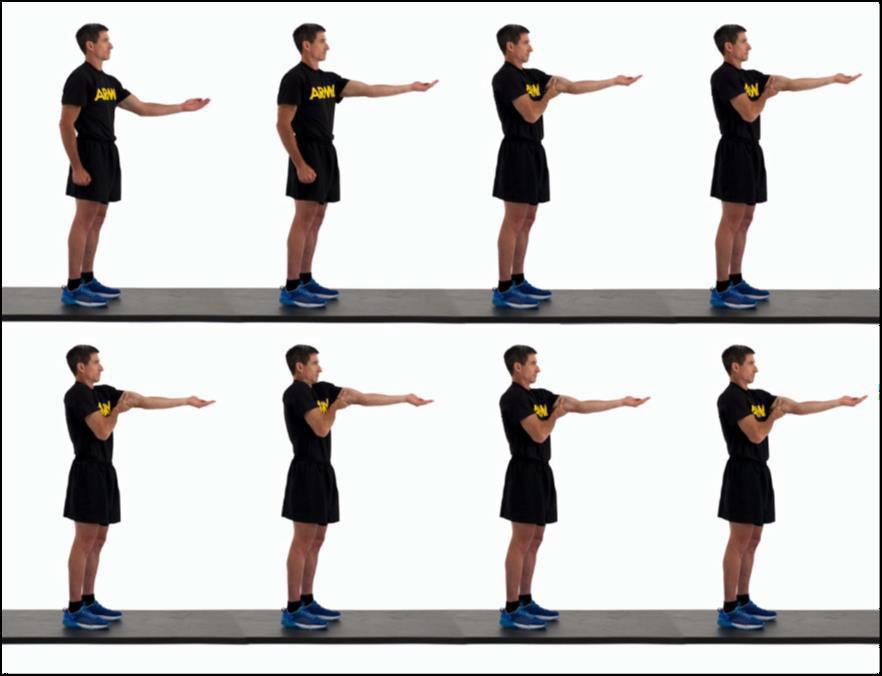
PMCS6 Arm 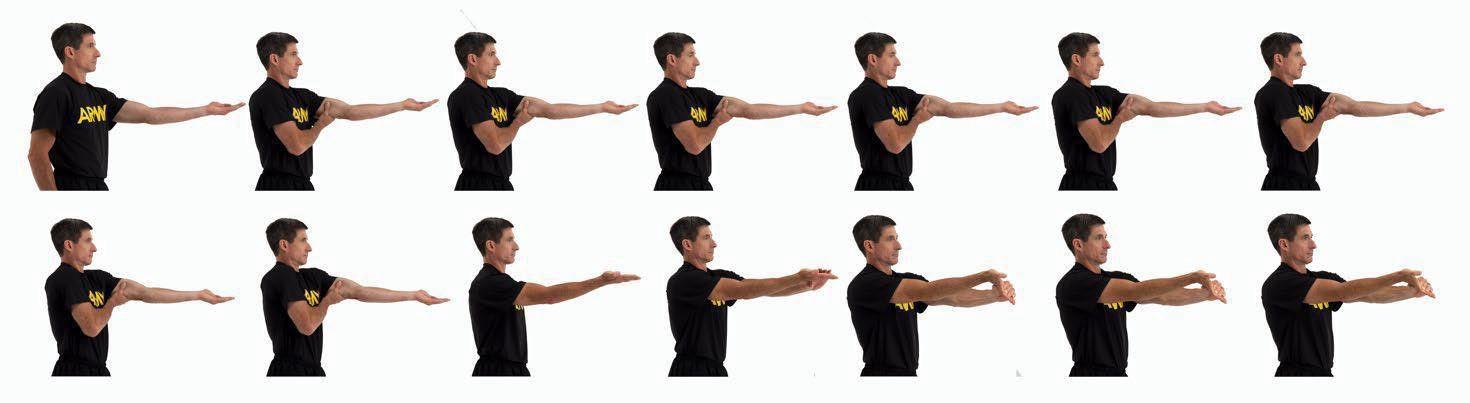
PMCS6 Elbow and wrist